Tuesday, October 24, 2017

The Leftovers Cake

The Diwali frenzy has died down. The diyas have been washed and stored away. The fairy lights have been brought down and carefully returned to their boxes. The din of the crackers had quietened. The belts have loosened a notch. And the fridge is groaning under the weight of the mountain of mithais!
While we wait an entire year to indulge in these special Diwali sweets, the week long exchange makes us groan at the sight of yet another laddoo or barfi
Short of giving it away or crumbling it into yet another kheer or dessert, there aren't too many options around. But this year I decided to be inventive!
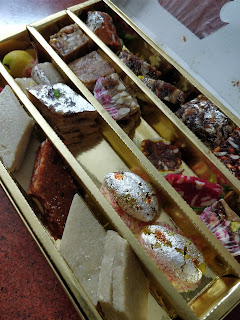


While the overdose of mithais had everyone gagging sweet, the realm of cakes had been untouched. If I could reinvent the barfis into a less sweet, unconventional tea cake, I was sure it would  find many takers. 
My inspiration came from the delicious Mawa Cake. This east meets west fusion was perfect for the cake I had in mind. After all, most mithais had a generous base of mawa to complement the dry fruits tucked within. Armed with a random mix of Kaju katlis, anjeer barfi, pista rolls and lavang latikas I set out to bring my experiment to life.
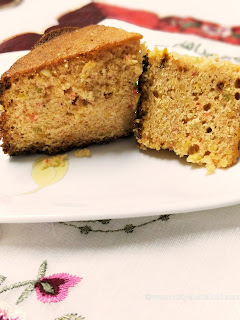
The result you ask? This gorgeous golden hued, light as air cake. The crust was crisp and inside was all soft sweetness. Redolent with the fragrance of mawa and dry fruits, this cake was an instant hit with the young and old alike. People came back for seconds. And thirds! Dipped into tea. Warmed for a quick snack. Topped with shrikhand for a rich dessert. This was definitely the most versatile product of my Diwali Leftovers! 
My fridge is emptied of all the excess mithai that lay unwanted. And I have a house filled with cake satiated tummies! Now if only someone can find a way to recycle all that Son Papdi!


nutsaboutfood

Ingredients:
Leftover Mithai                200 gm
Maida                               200 gm
Butter                               200 gm
Powdered Sugar               150 gm
Cardamom powder          1/4 teaspoon
Baking Powder                1 teaspoon
Eggs                                 4

Method:
Pre heat the oven to 180 C. Beat the butter and sugar well, till it is light and fluffy. Mix in the crumbled mithai. And beat well, till the batter is smooth. Sieve the maida, cardamom powder and baking powder and fold into the batter. Beat the eggs and incorporate into the batter. Mix everything well to get a smooth, consistent batter.
Alternately, if effort is not your thing, just whizz everything together in a food processor or mixie. Pour into a greased baking tin and bake for 45 minutes till a skewer inserted comes clean. Cool and slice!
Saturday, August 19, 2017

Gulab Jamun Cake

Traditional Indian Mithai and Cake? Doesn't sound quite right does it?! To most it seems incredulous that one carry marry the flavours of the Indian dessert palate with that of the European ones. But having successfully attempted the hugely popular Mawa Cake, I knew not only was it possible, but it was absolutely divine! A warm homecoming with the heady aroma of baking. 
Now those who have read my very first post, know that baking for my grandfather can be quite a challenge. But I hadn't been around for his birthday in a long time, and I really wanted to bake him something special. 
My news feed of late had been flooded with stories of Rasmalai Cake. While I personally don't enjoy rasmalai, it did give me an idea. I knew I had to make a cake that had its roots in the familiar. It really was a no brainer then. No dessert is ever as popular as the Gulab Jamun, and I knew I had to attempt yet another G-jam makeover.


I started my research and realized there had been a few attempts at recreating the magic, but nothing I looked at really hit the note. I read on and picked the brain of another Baking Diva I know. Also, Monster Munchkin would want to be part of the process, so I needed something simple yet drool worthy! This recipe seemed about right. But it needed a little more to make it truly festive and celebratory. I played with a few suggestions that would complement and not overpower the actual cake. And most importantly not push it to the realm of the too-sweet-for-seconds shelf. 
To be honest, I had my reservations even when I put the finishing touches. What if it was a total disaster? It seemed perfect on paper. The cake was light and baked to perfection. The frosting was not just a mouthful of oversweet fluff, and very consciously incorporated the only mithai my munchkin deigns to eat.  But what if my instincts were a little off! Heart in mouth, I carted it to my grandparents' place. Sure, it looked good. But aah! The all important taste test was still waiting. 
The first forkful, and my grandfather declared it a success! And it had nothin to do with the fact that his granddaughter and great grandson had baked it. For once, even my worst critic (Me!), had to nod in agreement. This was one for the kitchen heirlooms. A dessert that was going to grace my table many more times in the future!


Ingredients:

Cake:
Gulab Jamun Mix             3/4 cup
Whole Wheat Flour          3/4 cup
Sugar                                 3/4 cup
Milk                                  1 cup, warm
Vinegar                             1 tablespoon
Baking Powder                 1/2 teaspoon
Baking Soda                     1/4 teaspoon
Oil                                     1/4 cup
Salt                                    a pinch
Green Cardamoms            6

Frosting:
Kalakand                          200 gm
Almonds                           8
Cream Cheese                  180 gm
Gulab Jamuns                   8 small

Method:
Preheat the oven to 180 C. Mix the vinegar in the milk and keep aside for 15 minutes. Powder the sugar with the cardamoms. Sift all the dry ingredients together and give it a twirl with a wire whisk or spoon. Make a well in the center and add the rest of the cake ingredients. Whisk it well by hand or electric whisk till well blended. Bake in a greased 8 inch round pan for 35 minutes. Let it cool completely.
Upturn the cake onto a plate and slice horizontally in the middle. Liberally soak the two halves with the syrup from the gulab jamuns. Keep aside for 10 minutes. Lightly beat the cream cheese with a fork till fluffy. Spread a thin layer over the soaked halves. On the lower half, arrange sliced gulab jamuns to cover the entire area. I sliced my gulab jamuns into three parts, but it depends on the size if the jamuns. Now place the top half of the cake over this layer. The two halves reconciled, it was time for the final touch. Run the Kalakand in the mixer till smooth and mix into the remaining cream cheese. Generously swirl over your cake, letting your inner artist run free. Slice the almonds into chunky flakes and drop all over the frosted cake. 
I refrigerated the cake overnight and then brought it to room temperature before serving. But if your will power is being tested, you can dig in right away!


Tuesday, August 1, 2017

Almond Cheese Spread

We shook off the snow and tumbled into the house. We were cold and hungry. And you know what's my comfort food on a cold, snowy day? Hot, buttered toast! Nothing can make me feel as good. So aunty put the griddle on and liberally coated it with butter, placing two slices of bread to crispen to that beautiful gold. 
When she flipped it over to the other side, I thought we were almost done. But, nope! She had an ace up her sleeve. She dolloped on some cheese spread and let it just melt into the crisping toast. Dotted with ketchup. And then judging my impatience correctly, let me wolf it down straight from the pan.
I waited for the salty, slightly plastic cheesiness of store bought spread to hit my tastebuds. But instead was surprised by subtle flavours so generously complimenting the creamy goodness that could only come with homemade love!
It was so good, I wolfed down six toasts before my foodie brain could form the words, " May I have the recipe, please?"
That was 12 years ago, and I still slather this spread with the same reverent wonder. For me it has the same joy as my grandma's home made white butter. Another dairy addition to my toast I can't get enough of!
Another good thing about this cheese spread is that it sneakily incorporates the wholesome nutrients that  growing tots may screechingly run from. But ever know a kid to turn down cheese and toast? Nope! So say hello to our hidden superfood friends- Almonds and Garlic. Even Keto Hubby gave the spread a big thumbs up! It was just the thing he needed to jazz his Keto Bread :)
So I'll go steal a spoonful from the jar, while you go whip up your own batch of yummy health.


Ingredients:
Cheese           200 gm (grated)
Cream            1/2 cup
Milk               1 cup
Almonds        20
Vinegar          1 tsp
Sugar             1 tsp
Red Chillies   5
Garlic             5
Pepper           1/4 tsp

Method:
Soak the almonds and red chillies for half an hour. De-seed the red chillies. Remove the skin from the almonds and discard the water. Run the almonds, chillies and garlic in the mixie to make a coarse paste. Add the rest of the ingredients and blend till smooth. Refrigerate and use within a week.

Notes:
I used fresh cream (malai) skimmed off the top of our milk. You can use packaged cream as well. 
Since the chillies are soaked and de-seeded, they are not spicy and are mild enough for kids. You can however reduce the chillies if you like.
For the Keto version replace the sugar with Stevia. 

Saturday, July 22, 2017

Moist Honey Cake

Two rough looking mountain men stood outside my door. Wild eyes, chiseled features, long unkempt hair and sinister moustaches. "Bhaia ne bheja hai", they said. As I pondered which cousin had decided to prank me, Hubby turned up behind them. " They are with me." All further questions were preempted by the younger of the two. " Bhabhiji, patila. Fresh Honey hai hamare paas." 
Confession time. My hubby is pretty gullible when it comes to helping people in need. I have never known him to say no. Ever! So as I pondered what racket these guys were running, they produced a hive from their sack. Soon, oozing into my bowls was the fragrance of roses and spring! At least this was a sweet smelling racket. Three litres lighter and a few hundred rupees richer, the men departed happy.
Before I could launch my tirade, Hubby appealed to my health freak side. Uh uh! I was not falling for that. Honey may have health benefits, but there was no way i was consuming unprocessed honey! A few neighbours assured me this honey was marvellous. They had purchased from the Mountain Men in years past and never been disappointed. But I just wouldn't budge. So there stood the bottles in the pantry, forlorn and dusty. A month later, I opened them to check if they had gone stale. Once again, the promise of roses and sunshine enticed me. The monsoons were in full swing and the rains had me longing for spring. If I closed my eyes and inhaled the honey, I could just feel the fresh warmth around me. I had to figure out a way to incorporate this!
There was still no way I was going to consume it raw, so a cake was the safest route to take. Google to the rescue and I chanced upon Marcy Goldman's recipe. It had the right texture I needed and the ingredient list was perfect to warm up these windy weeks of grey rain! I scaled and adapted it from here. And my house was enveloped with the warm smells of heavenly baking!
This cake is not over sweet or sticky as most honey cakes are. It is light, almost delicate with an intense flavour that just gets better with time. No stale cake quandries with this one. Infact this cake was so good, I had to bake another batch the very next day!
So elevate your monsoon cuppa with your very own version of sunshine. And bake some goodness today. Don't worry about indulgence! Honey is healthy, remember ;)


Ingredients: 

Maida                    1 and 3/4  cups
Baking Powder      1/2  teaspoon
Baking Soda          1/2  teaspoon
Salt                         1/4 teaspoon
Cinnamon               2 inches
Cloves                    10
Ginger Powder       1 teaspoon
Nutmeg                  1/4 teaspoon
Peppercorns           4
Oil                           1/2 cup
Honey                     1/2 cup
Granulated Sugar    3/4 cup
Brown Sugar           1/4 cup
Eggs                        3 (small)
Vanilla Essence       1/2 teaspoon
Warm tea                1/2 cup (I used Early Grey)
Orange Juice           1/4 cup (fresh)
Orange Zest            1/2 orange
Whiskey                 60 ml

Method:
Pre heat the oven to 180 C. Grind together the cinnamon, cloves, nutmeg, peppercorns and ginger powder. In a large bowl whisk together the flour, baking powder, salt, baking soda and the spice powder. Make a well in the middle and pour in all the rest of the ingredients. Use a wire whisk to mix it all together. If you want to use an electric mixer, use it on slow speed. Too much air into the batter will spoil the texture of the cake. Scrape the bottom and the sides to ensure the batter is mixed thoroughly. Pour into a greased and lined 9 inch bundt cake pan. Bake for 60 minutes. The cake should spring back when you gently touch the center. Let it rest in the oven for 15 minutes before you demould and attack!!!

Notes:
I used early grey tea to intensify the citrus notes. You can use your regular brewed tea. Jus remember no milk or sugar.
You can also substitute the tea for strong brewed coffee.
You can bake the cake in three loaf pans, two 9-inch square or round cake pans, one 9 or 10 inch tube or bundt cake pan, or one 9 by 13 inch sheet cake. However I found baking in a ring or tube pan gave better results.
If you have large eggs, use 2 1/2 or just 2. 
The whiskey can be substituted with rum or fresh orange juice.


Wednesday, April 19, 2017

Ripe Mango Raita

Summers are here with their blistering cruelty and endless lethargic days. Yawning in the heat, food is really the last thing on anyone's mind. Unless it is a long sip of icy coldness. Sharbats, curds and salads rule the day. And of course, the king of fruits, the sweet sweet mango! Summers are practically synonymous with mangoes. The popularity of this royal fruit transcends all boundaries, and paens have been written in its praise! 
I remember summers in my uncle's orchards where the ripe mangoes had been tossed into the well to cool. Anytime we needed a mango fix all we had to do was lower the bucket and draw up some juicy goodness. Most households in India had a designated bucket in the corner of their kitchen. Filled with cool water and luscious golden mangoes. A friend of mine narrated an interesting custom at grandparents' place in Himachal. Once the mango season started, the kids would go visit, but would only be allowed once they had finished their allotted mini buckets of mango! 
Each household has mango based recipes they guard with the preciousness of jewels. Pickles, salads, jams, chutneys... all find a place in their repertoire. Now the best part of army life is that not only do we traverse diverse regions, but also form close bonds that last a lifetime. Over the years mum has amassed a treasure trove of traditional recipes via her fauji family.
One of mum's closest friends is Bhavani Aunty. She is one of the sweetest, most wonderful human being we've had the joy of calling our own. Not only is aunty a fabulous cook, but also an immensely creative one. She has the talent of spinning the most mundane into something exotic and drool worthy! And when mum tasted the Ripe Mango Raita at her place, she knew it was a recipe she would recreate time and again.
The traditional raita is made either with salad veggies like tomatoes and cucumber or with crispy fried gram flour boondi. But aunty's mango version was unusual and delicious! And really, what could be more summery than chilled curds swirled with chunks of sensational mangoes!
  

NUTTYABOUTFOOD

Ingredients:
Curds                      500 ml
Water                      150 ml
Mangoes                 2, medium
Onion                      1, small
Green chillies          3

tempering: Mustard seeds       1 teaspoon
                   Curry leaves          3 sprigs
                  Red chilli powder   1/2 teaspoon
                  Oil                           1 teaspoon

Method:
Whisk together the curds and water till smooth. Add salt to taste. Finely chop the onion and green chillies. Mix into the whisked curds. Cube the mangoes and gently toss into the mix. Prepare the tempering by heating the oil and letting the mustard seeds splutter. Throw in the curry leaves and let them crisp. Turn off the gas and add the red chilli powder, Swirl the tempering over the prepared raita and chill in the refrigerator for a while. Serve as a side with pulao or biryani. And to be honest, it tastes fabulous on its own!

Tuesday, April 4, 2017

Keto Bread

A low carb, gluten free bread? It never did sound appetizing to me. But then Hubby darling went Keto, and our entire carb approach was tossed into the can. Adapting existing recipes to fit Keto was not as tricky as most fear. Infact as Keto became norm, exciting new twists were born of old classics. 
And though he loved his rice and parathas, hubby didn't quite miss them as much as he had expected. It really was a win win for him.
There was one thing he did miss. While never a fan of regular sliced bread, he had started to crave toast. Who wouldn't when your breakfast is bacon and eggs sunny side up. After all, you need something to mop up all that gooey goodness! Thus was born the need to experiment with a keto friendly bread.
Now the most popular keto breads are almond flour based. Though delicious, almonds aren't quite budget friendly. Every keto forum had people moaning about increased dents in the pocket. So I figured let's do a keto bread that won't break the bank.
I scoured the net for dozens of recipes and finally found my inspiration here. I tweaked it a little so i wouldn't have to make a store run. A few easy steps and surprisingly I got gorgeous golden bread!

nuttyaboutfood.com

Ingredients:
Eggs                                             6
Dessicated Coconut Powder        3/4 cup
Flax Seed (Powdered)                   3/4 cup
Salt                                               1 tsp
Baking Powder                             1 tsp
Psyllium Husk                              4 tablespoons
Baking Soda                                  1/2 tsp
Warm Water                                   1/2 cup
Apple Cider Vinegar                      1 tablespoon
Oregano (optional)                         1 tsp

Method:
Whisk together all the dry ingredients, except oregano. Add the wet ingredients and mix well. Put it in the fridge while you preheat the oven to 180 C. Grease a rectangular baking pan. I used a 13x6. Bring out the batter. Give it a good mix and pour into the dish. Top with crushed oregano. Bake for 40 minutes on a low rack. Cool and slice into 14 squares. It stays happily refrigerated for upto two weeks. Bring out a slice or two. Grill them, toast them, pan fry  them or simply slather cold with some cream cheese and fix that bread craving!

nuttyaboutfood.com

Thursday, February 16, 2017

Keto pork

Love is in the air. As are chocolates and all things sweet. Now I could make a grand Valentine gesture with a cake. But that would be more for me than Hubby Darling. He's never had a sweet tooth, and now that he's on Keto he happily gives desserts a miss. 
He does ecstatically indulge in his favorite foods, though. The ones that make Keto a dream diet for him. Over the past few months, we've been happily experimenting with varied versions of deliciously rich meats. And the most Keto friendly has been Pork. Needless to say Hubby is over the moon! The Goan Pork Sorpotel had been a firm favourite, but we've had to retire that as it wasn't very keto. That left us with the Arunachal style and the mince with spinach. Now Hubby doesn't mind eating the same day in and day out, but how could I let this creative challenge slide?!
Inspired by the simplicity and clean flavours of the Junglee Maas, the Keto Pork was to take a similar direction. Only this time I wanted the flavours to be fresher, sharper. And also closer to the Bhutanese Ema Datshi. 
The Keto Pork has minimal ingredients that are easy to find and yet maximize the taste. It has a familiar warmth reminiscent of Maa ke Haath ka khana. Even if your Maa didn't cook pork! Like most recipes, this one is pretty adaptable. If pigs make you squeal, use meat or chicken. Just amp up the fat factor as they don't have the same amount of fat as our Oink Oink! You can tone down the chillies. Swap the herbs. Play around and make the flavours truly your own!


Ingredients: Pork with Fat                      1 kg
                      Ghee                                   8 tablespoons
                      Green Chillies                    20
                      Garlic with green tops        12
                      Coriander leaves                 1 bunch
                      Peppercorn                          20 (coarsely crushed)
                      Salt                                      to taste

Method: Grind together the green chillies, garlic and coriander. I prefer it coarse for a rustic flavour, but you can keep it as coarse or fine as you like. Heat the ghee in a heavy bottomed pan. Add the pork pieces and saute till the edges turn a little crisp and golden. Add the rest of the ingredients and mix well. Add water just below the level of the meat. Turn the gas down to sim. Cover and cook till done, stirring occasionally. Soup it up or chow down with some cauliflower rice. Happy Ketoing!


Tuesday, January 10, 2017

Kheer Komola

The new year is upon us. A whole 365 days filled with opportunities. And given the blogosphere trend, this post should be about resolutions and hope. But I am perennially optimistic and I really don't do resolutions. If I did I would have long ago vacated my warm couch, and walked out battling the real world. Instead I choose happily to sink further into my warm spot, snuggle my dog and monster munchkin closer and go tap tap on my browser.
Its not that I don't like interacting with the physical world. It is jus that I am plain lazy! I remember when my friends raved about the benefits of retail therapy, all I could think was why anyone would abandon their pajamas and blanket to battle crowds and look at racks and racks of the same boring stuff!
Then online shopping came along and my brain went Aah! This makes more sense. So there I was indulging in some post festive, end of reason sales therapy when I chanced upon Santrawale. They sell, well, oranges! Not just any oranges though. Organic, sustainable, sourced from farm oranges. They had me at Organic! So tappity tap and I had two dozen juicy Nagpur oranges on their way. 
Now if you've browsed my previous orange post you will know that I was suddenly struck with the question again. What the heck do I do with all those oranges. The marmalade batch was still going strong so that option was out. Wine was option two. But that was really a long term project. 
The new year demanded a new approach. (There I've done my bit of following blog trends) I needed something different. Something unexpected. Out came the journals and cookbooks. 
Kheer Komola popped up twice. Milk and Oranges? Sounds like a recipe for disaster right? And yet there were people out there enticing me to give it a swing. It was too cold for a souffle, but a dessert was definitely on my mind. Did I dare to try? 
It wouldn't be my first attempt at Orange Kheer, to be honest. A long time ago I had ignored mum's words of wisdom and experimented for a dinner party I was hosting. The recipe had been tried and tested by Good Housekeeping so what could possibly go wrong? Plenty, as it turned out! Instead of the refreshing, creamy dessert I ended up with a bowlful of dense gloop with a bitter aftertaste. To their credit, my guests actually ate their dessert and assured me it wasn't that bad. That disaster still loomed large in my food memories. And I do have this annoying need to conquer all peaks. So I geared up for round two of Kheer Komola challenge.
This time I was better prepared. I turned to friend Google and read every variation I could find. I said a short prayer. Brushed aside mum's skepticism and dad's ribbing. Nothing ventured, nothing gained. Ignoring the monster munchkin's calls I concentrated completely on my kheer karma. And it paid off! I was finally rewarded with a creamy yet light dessert that brought with it the promise of a refreshing spring with its delicate citrus touch. (Yes I can poetically romance food.) This was Kheer Komola the way I had imagined it. And so you can put away your search results. Go on and benefit from my Experiments with Oranges! And be prepared for friends and folk to be wowed by your brave and unusual dessert masterstroke.


Ingredients:
Milk                              2 litres
Oranges                         7
Sugar                             10 tablespoon
Green Cardamoms         5 or 6
Saffron                           a few strands

Method:
Heat the milk in a heavy bottomed pan. Once it boils, reduce the flame to the lowest and let it simmer. Soak the saffron stands in a tablespoon of the warm milk and keep aside. In the meantime, separate the segments of the oranges. Carefully, split the segment and discard the thin outer membrane. The white membrane is what caused the bitterness in my previous attempt. Remove all seeds as well, taking care to preserve only the pulp and juices of the oranges. It is a monotonous and exacting task, but then that's what makes this kheer so special. It is actually a labour of love! Powder the cardamoms, and don't forget to stir the milk every once in a while, scraping the bottom to ensure it doesn't stick and burn. Once the milk has reduced to less than half the quantity, blushing with a creamy hue, stir in the sugar, cardamom powder and the saffron soaked in milk. Let it simmer for another five minutes and then turn off the heat. Let the milk cool to lukewarm and then gently stir in the orange pulp. Allow the milk to be infused with the citrusy goodness overnight or for atleast four hours, If you are in warmer climes, serve this chilled and topped with pistachios. If like me you are freezing and need a reminder of the spring to come, serve the kheer at room temperature. And if like my father you want everything piping hot, just zap a bowlful in the microwave for 30 seconds. Either way, you won't be disappointed.