Thursday, December 8, 2016

Not Just Any Hot Chocolate!


Growing up on a healthy diet of Enid Blytons and Archies, I was besotted by the seemingly exotic Hot Cocoa. Sipped steaming with a tossing of marshmallows, seated on a warm rug in front of a roaring fireplace. A dog cuddled next you and a throw carelessly wrapped around the shoulders. Really, that was the romanticism of winter for me. I dreamt of staring out the window, watching the snow fall softly as I warmed my palms on my very own cup of Hot Cocoa, the aroma of chocolate wafting through my senses. 
Mum didn't laugh off my fantasies. She indulged me with her shorthand version of the Hot Cocoa. But warm milk with drinking chocolate just didn't have the same magical feel. Dad would add a capful of brandy and insist it was the secret ingredient to that elusive taste. But sigh! My literary tastebuds weren't fooled!
Many snowfalls and failed milky cocoas later, I found it! As Nigella beamingly stirred her pot of hot chocolate, I knew it was The One! I could almost inhale the aroma through the telly. And I wasn't wrong. I made it the very next evening. And as we sipped it under the wintry stars, my chocoholic cuz agreed every sip was a trip to heaven. We had found the Hot Cocoa of our literary dreams!
Over the past few years, I've played around with the flavours, tweaking it a lil here and there. Made it truly my own. And as the winter chill nips my toes, I tuck em under my snoring dog, pull my Naga shawl a little closer and revel in that warm, molten chocolate dreamily making its way down my throat. The magic is alive. And this is Not Just Any Hot Chocolate! 


Ingredients:
Milk                            2 cups
Dark Chocolate           100 gms, chopped or shredded
Cinnamon                    1/2 inch stick
Brown Sugar               1 teaspoon
Vanilla Syrup               1 1/2 teaspoon
Peppercorn                 4, crushed coarsely
Rum                            1/4 cup

Method:
Pour the milk, chocolate, peppercorns, sugar and cinnamon into a saucepan. Heat on the lowest flame till the chocolate dissolves completely. Take off the heat and add the rum and vanilla syrup. Whisk well. Strain and get ready to be transported to Chocolate Heaven!

Notes: I used Monin Vanilla syrup but you can easily replace it with vanilla extract mixed with honey. And if you want a more decadent experience, substitute half cup of milk with Amul fresh cream :) 


Tuesday, November 22, 2016

A Spoonful of Immunity: Turmeric Amla Pickle


" Aah! You can feel the healing goodness travel through your entire being," exclaimed Mads Masi with every bite. That definitely had my attention. I backtracked to the table to get better acquainted with this health bomb I had missed. Never would I have guessed that the bowl of blinding sunshine I had dismissed as just another chutney was the reason for the health hallelujah! 
Turmeric and Amla Pickle. Yet another ingenious method Nani had devised to sneak immunity into our daily food. And its no grandma's tale, really. Science has backed the benefits of the Indian gooseberry for years. And turmeric of course, is already hailed as the super-food of 2016.

Turmeric has proven anti-inflammatory properties. It has been known to reduce the risk of cancer, normalize insulin levels, banish aches and arthritic pain, promote healthy digestion and boost brain function. Now, I could list all the proven benefits in detail, or you could just read them here and here.
As for Amla , the humble and much ignored Indian Gooseberry is loaded with Vitamin C making it ideal to stave off those pesky coughs and colds. The high iron content is great for combating anemia and getting that gorgeous glow. It is also a known agent for stabilizing blood sugar, promoting heart health and also the high fiber content means bye bye constipation.
On their own turmeric and amla are a little strong to munch. But toss them together in this super healthy and you will have the entire family lining up to get their daily dose. Bursting with freshness and flavour, who would have thought great health came in such chatpata form!
And yes, Mads Masi was right! You can truly feel the healing goodness travel through your entire being!

Ingredients:
Raw Turmeric Root        250 gm
Amla                              250 gm
Lemons                          3
Kala Namak                  to taste
Sugar                             3 teaspoon
Oil                                 2 tablespoon
Asafoetida                     a pinch
Red chilli powder          1/4 teaspoon

Method:
Grate the turmeric and amla as finely or coarsely as you like. Toss in the sugar and kala namak or black rock salt. Squeeze the juice of the lemons on top and mix well. Heat the oil in a small pan till it starts smoking. Add the asafoetida and turn off the heat. Let the oil cool a little and then add the red chilli powder to it. Once the oil is completely cool, mix in with the rest of the ingredients. Spoon into  a sterilized bottle and let it rest in the fridge. After three days, the pickle is ready to eat. It keeps well for a month if refrigerated. Just a spoonful with your lunch and let the pickle work its magic!
 

Saturday, November 12, 2016

Cheese Straws

I was not a skinny child. Far from it really. The culprit though was Mum. She is an amazing cook and kept me interested in food by dishing out a wide variety of delicious home cooked food. An expert of most cuisines, her passion lay with baking. It was no coincidence then that I always had a tempting array of cakes, cookies and crackers to snack on. Even the extra miles Dad made me run weren't enough to dent the sunshine of Mum's baking! 
One of my favorite things to munch on were these twisted golden delights. Cheese straws! Aahh! The very name was enough for my tastebuds to conjure the crisp-buttery-melt-in-the-mouth-cheesiness. Every batch Mum baked would disappear in minutes, even as the melted cheese scalded my tongue. I never could wait for them to cool down! 
Its not just me, but Hubby darling as well. The first time I made them, he insisted that these Cheese Straws become a pantry staple. And they do have to make an appearance at every party I host. Served plain in bowls or with a choice of dips, these go down fabulously with kids and adults alike. And when you snuggle with a book and hot tea on those wintry afternoons, these little twists will keep you good company! And when you run out, they are easy enough to bake on demand :) 


Ingredients:
Cheese          50 gms
Butter           50 gms
Flour            1 cup
Salt              1/2 teaspoon
Milk             1/2 cup
Pepper          1/2 teaspoon
Oregano       1/2 teaspoon (optional)

Method: Sift the flour and salt together. Grate the butter and cheese into the flour and mix lightly. Adding a little milk at a time, mix it into a smooth dough. Do not knead. Divide and flatten into two halves. Cover with clingfilm and freeze for an hour. Unwrap and roll out  to a thickness of 1 cm. Like a thick roti. Sprinkle with the pepper and oregano. Cut into strips and twist. Preheat the oven to 180 C and bake for 15 minutes till crisp. You can vary the flavours by experimenting with the herbs you sprinkle on top. And do try to wait for them to cool before you take that first bite!

Saturday, October 29, 2016

Bread Gulab Jamuns

Gulab Jamuns could truly be the most pan-Indian dessert. Found in every corner of the country, big and small, the flavour rarely varies despite the regional twists. Rose, kewra, cardamom, saffron... the gulab jamun still tastes just like home. 
I have yet to meet a person who doesn't like gulab jamuns. Or G-Jams,  to borrow a term from my cousin. Even those who prefer savoury over sweet can rarely resist the call of the G-Jam! Really, what's not to like? Golden, fried dumplings soaked in cardamom scented sugar syrup. Exotically delicious, yet endearingly simple!
The commercially available G-Jams are usually made of khoya. And homemakers like mum choose the less complicated route of instant G-Jam packets that use milk powder for a smoother, lighter version that is a lot less complicated than the original. And then there is a third, more unorthodox version. The Bread Gulab Jamuns!
I was first introduced to the bread version during my college years. Homesick on diwali, one of our friends surprised my roomie and me with a huge box of gulab jamuns. Made by his fauji mess cook. As we popped the first one into our mouth, he dropped the B-word! These were made with regular white bread! Despite being a foodie and a cooking enthusiast, I would never have guessed had he not told us! As for the taste? Suffice to say I disappeared with the entire box, coz, " Joey doesn't share food!"
I've been looking for the perfect recipe ever since and after many years of trial and error, I've created one that would have made the old Cook baba proud!


Ingredients:
Bread                        12 slices (I used wholewheat)
Custard Powder        3 tablespoon
Baking Soda             1 teaspoon
Milk                          2 cups
Sugar                        1 1/2 cup
Water                        1 1/2 cup
Cardamoms              3
Oil                             to deep fry

Method: Trim the edges of the bread. Soak a slice of bread in milk and squeeze to remove the excess. Repeat with all the slices. Run the crumbled, wet bread with the custard powder and baking soda in the food processor. Gently pulsing twice to obtain a smooth yet firm paste. Heat the sugar, water and crushed cardamoms in a deep pan till the syrup reaches a sticky, one string consistency. Take off the heat. Meanwhile, gently form the bread paste into smooth balls. Take care not to press too hard while rolling them or the consistency will not be spongy. Heat oil and gently drop the bread jamuns few at a time. Cook over medium heat so that the outside doesn't brown before the inside cooks. Once they are evenly golden, drain on kitchen paper and transfer to the warm syrup. Repeat with all the G-Jams. You can eat them warm or chill them in the refrigerator to serve later. Either way, they are easy to make and are always a blockbuster hit!


Saturday, October 15, 2016

Junglee Maas


My grandfather was eighty plus when one fine day he loaded a rucksack into the back of our jeep. Picked up an old army pal of his and drove straight across the country, from the south to the north east. We had no clue where he had gone or when he would be back. A month later he returned, with a rejuvenated laugh and a twinkle in his eye. And a huge wild boar in the back. Ready to be skinned and pickled.
Shikaar! Aah! That word throws up romantic images of tough men on horseback or open jeeps, rifles slung on the shoulders, tracking the elusive beast through dense jungles. Fearless and focused. Images of late night campfires and rustic food. Smells of sweat, rum and meat mingling with the smoke and the cool night air. 
I've never been on a shikaar or hunting expedition. But the vivid recollections of my father and grandfather transport me to those adrenaline fuelled times. When being true to the roots also meant being in touch with the most basic survival skills handed down by the primitive tribe. 
Hunting expeditions often lasted for days and meals had to be rustic and basic. Carrying fancy ingredients was out of the question. The meat was shot fresh and the only spices used were those that would not perish in the punishing heat. Out of these expeditions was born the hunter's Junglee Maas. A one pot dish with no frills and just a wholesome meaty flavour. High on calories and protein, this was the perfect meal to energize travel weary bones and sore muscles.  


The original recipe calls for ghee, red chillies, salt and of course, meat. The resultant dish is a mildly spiced, juicy and tender meat, crowned by a flaky and crisp exterior. A contrast that delights with every bite. The gravy is thin with a buttery goodness. And if you make it under a starry sky on an open fire, the smokiness from the wood will elevate it to a whole other dimension. 


Ingredients:
Goat Meat                 1 kg
Dry Red Chillies       20
Ghee or Butter          250 gm
Salt                            to taste

 Method: Melt the ghee/butter in a deep pot. Add the meat and the red chillies and cook for a medium flame till all the pieces are generously coated with the ghee. Add the salt and just enough water to reach the level of the meat pieces. Reduce the flame and cook covered till the meat is done. Stir occasionally, adding water if the dish starts to dry. Slurp it like stew, soak it with bread or serve up with some steamed rice.


Friday, September 16, 2016

Chocolate Rum Cake


Drunk texting? Sure! We've all done that at some point of time. But drunk blogging? Well, that's definitely a first for me! Blame it on my mum's birthday. Yes, you read that right! Its my mum's b'day and her b'day cake that's gotten me here. Not that I am complaining! I could probably go for a couple of slices more, though the blurred edges of the words warn me otherwise.
Let me start by saying that my mum's favorite present are those beautiful boxes of dainty liqueur chocolates. With very little time to shop, I am embarrassed to say I came up with naught. This would have been acceptable had I a heartwarming present on standby. But alas! I failed there as well. So I thought of the next best thing. Make her some liqueur chocolates. And as my brains unfroze they decided to take it a step further. Chocolate and liqueur in a cake. An all in one dessert! 
Now it would have been great had I stuck to the thought and used one of my regular recipes. But no when you go big, why not go grand?! That's when we went from dainty to drunk! In my quest for the best ever chocolate rum cake, Google kept pointing me towards the Caribbean inspired dark chocolate and rum cakes. And the more I read, the more I knew I just had to make the most chocolatey, most boozy ever rum cake. Decadent and degenerate. 
Enter the recipe on foodinmybeard. After having devoured hundreds of rum and choc recipes, I can honestly say that this was hands down the booziest and easiest cake around. I knew I wouldn't rest till I made it. And well, ate it! Now the cake came out of the oven looking all normal and innocuous.
 

And then it was subjected to this. Now the bottles on top are merely to add weight to the lid, and don't actually form part of the recipe. But below the lid is a sinful, booze addled rum butter sauce that with the extra weight squishing it down, permeates every crumb of an already very rummy cake. The result? Drunk Blogging!

Ingredients:
Dark Chocolate Compound     170 grams
Butter                                       1/2 cup
Dark Rum                                1 cup
Flour                                        1 cup
Eggs                                         4
Sugar                                       1/2 cup
Brown Sugar                            1/2 cup 
Baking Powder                        1/2 teaspoon
Baking Soda                            1 teaspoon
Cocoa Powder                        1/2 cup
Salt                                          1/2 teaspoon

Rum Butter Sauce
Butter                                      1/4 cup
Sugar                                       1/4 cup
Dark Rum                                1/4 cup + 1/2 cup

Method:
Microwave the butter, chocolate and rum for 30 seconds. Whisk. If it hasn't melted completely, microwave again for 30 seconds. Whisk till smooth. Add the sugars and whisk well. Now add the eggs one at a time, whisking well after each addition. Sift all the dry ingredients together. Add half the dry mix to the wet batter and mix well. Now add the rest and mix till combined. Preheat the oven to 180 C. Pour the batter into a greased and lined cake tin. Bake for 45 minutes or till done. Once the cake is done, take it out and poke holes all over with a toothpick or skewer. Gently pour over the entire butter sauce. Cover with a lid that touches the surface of the cake, and weigh down with additional bottles. Once the cake cools completely, flip onto a serving tray and for once, you can drink your rum and eat it too!
Rum Butter Sauce: Heat together the butter, sugar and 1/4 cup of rum. Bring to a boil and let it boil for a minute more. Take off the heat and whisk in the remaining 1/2 cup of rum. Pour warm over the cake. This is the lethal weapon that turns your cake from decadent to drunk! 

Sunday, September 4, 2016

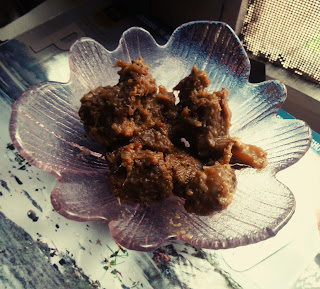
Meat pickle

I can't stop dancing. Or singing. Its that time of the year finally! Time for my annual vacation home. Three weeks of doing absolutely nothing. Three weeks of being completely pampered by mum and dad. And three weeks of gorging on all my favourite food, cooked not by me, but by mum, granny, aunt and my darling Robert uncle! And yes, I absolutely aim to overindulge!
Last Sunday as we sat making plans for the upcoming vacay, Hubby Dear issued a dire warning against pilfering his share of the meat pickle this year. You see, every year when we go home, Mads Masi bottles a jar of the most sinfully addictive meat pickle, exclusively for HD. It was great in the earlier years when I was following a vegetarian diet. But then I returned to the meat fold, with a vengeance! So when last year's batch made its way to us, HD was none to happy he had to share. But imagine his disappointment a couple of hours later when he poured himself a chilled beer and headed to spoon a few pieces of his favourite snack. The pickle jar was empty! In my defence, running after the monster munchkin all day is hungry work. And did I mention the pickle is sinfully addictive?!
He was of course mollified when Masi bottled a batch specially for him and I swore to keep my fork away. 
The memory though, remained. Hence, the dire warning! And that was what led to my sleepy sunday turning into a sweaty one. Ever had one of those moments when you share a food memory and the description is so vivid you can almost taste it in your mouth. And so strong is that sensation that you just have to have it. Like right that moment. Or your tastebuds will drive you nuts as you drool unchecked?! Well, lets just say we needed our meat pickle fix. Right that moment. A week was too far away!
A frantic call to Masi for the recipe and we were raring to go! The only hitch? Goat's meat wasn't available! But as my friend said, Baa ain't too far from Oink. So pork it would be! The promise of that tangy, tasty pickle spurred everyone into action. HD took off to bring us the choicest cuts. And Oink Friend helped peel, chop, grind and stir. And stir. And stir! And...excuse me, while I go polish off that last forkful ;)


Ingredients:
Meat (boneless)       1 kg (goat/beef/pork/lamb)
Mustard oil              1 1/2 cups
Ginger                      100 gms
Garlic                       125 gm
Vinegar                     1/3 bottle
Sugar                         a pinch
Garam Masala          1 heaped tablespoon
Salt                            to rub

Method:
Wash the meat well and rub the pieces with salt. Keep aside for two hours. Grind the ginger and garlic to a fine paste. In a heavy bottomed pan, heat the oil on high flame and saute the meat. When the pieces start shrinking, and the meat is half done, add the ginger garlic paste. Reduce the flame to the minimum. Add cook till the meat is done. Stir frequently in between to ensure the meat doesn't stick to the bottom of the pan. Add the sugar and garam masala and cook for another five minutes. Let it cool for 1/2 an hour. Stir in the vinegar and store in sterilized jars. If the weather is warm, it is better to keep the pickle refrigerated. It will keep in refrigerator for a couple of months. Provided of course, you have the willpower ;)

Monday, August 1, 2016

Wine


There was a lot of backlash for my previous post. Homemade raisins? My friends and family couldn't believe I would waste precious grapes like that when instead I could have used them for more intoxicating purposes! To them I say, Fear Not! Of course, everytime I have a stockpile of grapes, the first thing I do is ferment a batch of my very special wine.  
You could say wine making is in my genes. My maternal grandmother did a professional course in food preservation, and with all the jams, jellies, pickle and marmalades, she also made vast quantities of sweet red wine. Bottles of which made an appearance even twenty years later. It is another matter though that being a teetotaller she never tasted a sip of the stuff. The rest of us, well, we were a 'happy' bunch! 
My paternal grandfather was quite the vintner as well. He was more experimental and apart from grapes, also distilled beetroot, carrot, apricot and mixed fruit wines. He was also known to brew his own beer at times. But that's a tale for another post. 
It comes as no surprise then that every year I distill a few bottles of the potent stuff for my friends and lazy sunday brunches. If you think wine making is complicated and time consuming, you are wrong. It really is the simplest. And requires very little effort on your part. After all, Nature does most of the hard work. 

Ingredients:
Grapes       2 kg
Sugar         1 kg
Yeast          1 tsp
Water         just enough to cover the grapes
Rum           1/2 cup (optional)

Method:
 Remove the stalks of the grapes and wash them thoroughly. Put them in a large glass jar with a wide mouth. Pour the water and mash the grapes coarsely. You can use your fingers or a potato masher. Add the sugar, mix and keep in a cool, dark place. Make sure the lid is secure. The next day, add the yeast to 1/4 cup luke warm water. When it froths, mix into the grapes. Cover and return to dark place. Let it stand for 21 days, ensuring you stir it with a clean, dry spoon every two days. On the 21st day, strain through a muslin cloth and add the rum. Pour into clean, dry and sterilized glass bottles. Store in a cool, dark place and leave to mature for two months. After two months, call over your friends and uncork a bottle for some good times!

Thursday, July 14, 2016

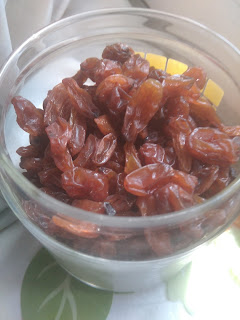
Homemade Raisins


Its been a while that I've posted on the blog. That didn't mean I wasn't experimenting and turning my kitchen into a lab! The last I posted I was working my way through a large batch of oranges. Well, the oranges met a delicious end. And then came the avalanche of grapes. They found their way onto salads and fruit cream and the monster munchkin's snacks. But just when I thought I was done with them, a whole new bunch would make it to my fridge. This needed large scale tackling and I figured let me save them for a rainy day. Now the only way to make them last intact till the aforesaid rainy day was the sundried way aka raisins.
Now, i am a raisin phobe. Cannot abide those slimy squishy things in any dessert or cake. But hubby dear and monster munchkin like em well enough. And they are great for zinging desserts when we've got company. I trawled the net for various recipes and in the end settled for one I found between the yellowing pages of the first recipe diary I started at the age of ten! It is simple and requires practically no effort from my end, And a few glorious days later, I get rewarded with glossy, granola worthy raisins. It was almost like Farmville all over again!

Ingredients:
Seedless Grapes     1 kg
Water                      1 litre
Milk                        1 tablespoon

Method:
Remove the grapes from the stalk and wash them well. Boil the water and milk together in a deep pan. Add the grapes and continue boiling till the grapes turn a lighter green. Drain well in a colander. Spread out on a thin cloth under the sun. Cover with another thin muslin. After three to four days of bright sunshine, voila, the grapes are now golden raisins!


Monday, April 25, 2016

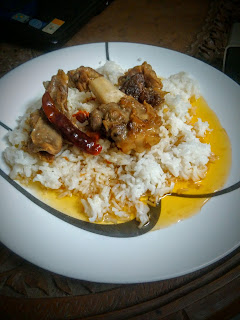
Pork Sorpotel

My earliest memory of my uncle was of a tall, mustachioed guy with a booming voice. It was dislike at first sight. How dare this loud creature take my delicate Masi away from us. I clambered furiously up to my aunt's arms and declared. " Masi iss aadmi ke saath nahi jayegi!" (My aunt shall not leave with this man!) No one paid heed to my decree. And for that i am grateful!
Over the years I came to adore him. He was a madcap friend with a great taste in music and a shared love for PJs and puns! He was a neatness freak who drove us crazy. He was the life of the party, always up for a pint. And he was a insatiable foodie who was also a fantastic cook!
Sunday afternoons at his place usually meant beer, conversation and pork. Cooked with his meticulous perfection and served with a whole lot of love. When I started my food blog, he was always the first to leave a comment. He was my testbed for some of the more experimental recipes. And he always complained that I didn't devote enough space to his favorite red meat!
The last time I met him, I promised I would perfect my skills and wow him with the ultimate pork dish. And I did! Perfect it. But I still needed his final approval on it. I clicked a pic and sent it across. He texted that it looked tempting and he was looking forward to the taste test. Alas! That shall never be. He was taken away too soon, too sudden.
This post is in your memory my MeshoMoshai ( I can see your eyebrows shoot up and your mouth hang in shock at that traditional address!) I guess I'll have to wait till I join you up there for your seal of final approval. Till then, I know you look down and send me all the love and luck. And plentiful beer to go along with this spicy Pork!


Ingredients:
Pork                        1 kg
Red Chillies            25
Coriander seeds      1 tablespoon
Peppercorns            15
Garlic                      10 cloves
Cinnamon               2 inch
Tamarind                an onion sized ball ( roughly 5 tablespoon)
Turmeric                 1 tsp
Cumin                     4 teaspoon
Onions                    4
Green chillies         6
Ginger                    2 inches
Vinegar                  1/4 cup
Sugar                     1/2 teaspoon

Method: 
Finely chop the onions, ginger, garlic and green chillies. Grind together the rest of the ingredients except pork and sugar. To the pork, add just enough water to reach the level of the meat. Boil pork till it becomes light pink in colour. Add the ground masala, the chopped ingredients and salt to the pot. Pressure cook for 30 minutes. Once the cooker cools, add the sugar and thicken to the consistency you like. Serve hot with steamed rice and chilled beer!


Saturday, April 16, 2016

Mocha Layer Pudding

Everybody loves dessert. And if you are me, you probably skip the main course to make room for dessert. But be warned! You can't serve me ice cream and call it dessert. Ice cream is ice cream. When I was younger, parties always meant light citrus souffles and decadent mousses. There were multi layered trifles and warm, gooey flans. Ice creams were for weekdays when mom was too busy to whip up dessert. 
Of late though, desserts have vanished from the dinner parties. Too complicated and tedious, say the ladies. Trust me, it doesn't have to be. I am no superhero domestic diva, but I do manage to serve up a duo of desserts at the dinners I host. This Mocha Layer Pudding is almost always a permanent on my menu. And it only takes me five minutes. Honest! 
Give yourself a treat today and go ahead and try this blockbuster hit. I promise you will never fear once you've tried this dessert dare!


Ingredients:
Bread                          10 slices
Cocoa Powder             6 tbsp
Coffee Powder            1/2 tbsp
Sugar                           6 tbsp, powdered
Fresh Cream               500 gms
Walnuts                       1/2 cup, chopped
Rum or Brandy          2 tbsp (optional)

Method:
Run the bread in the mixer to make bread crumbs. Whip the cream lightly and add 2 tablespoons of sugar and the brandy or rum. To the bread crumbs, add the rest of the ingredients and mix well. In a serving dish, spread a layer of the bread mix. Then pour a layer of the cream. Repeat layers till the ingredients are used up, ensuring the last layer is of the cream. Garnish with chocolate bits and shavings and some walnuts, Refrigerate for an hour. And you have yourself an easy dessert to indulge!


Tuesday, March 15, 2016

Orange Whiskey Marmalade

The markets are flooded with oranges. All shapes, sizes and sweetness. Tempting you with their fresh, springtime aroma. Tempting enough for hubby to haul home an entire crate! Its been a week, and there they lie, begging to be devoured.
Unfortunately, the only fruit enthusiast at our place is the monster munchkin. And frankly, I am terrified he'll choke on the pips. And no, I am far too lazy to sit patiently and peel and de-seed the segments. Let him be content with kiwis, plums and berries for now.
That still leaves me with a crateful of oranges that no one wants to eat. Its not warm enough for a fruit salad or even juiced oranges, so I decided to take the route less travelled. Do I dare to attempt marmalade?
My past efforts at jam making have always resulted in mushy, oversweet pulp. Do I dare subject these vibrant citrus to what may result in another failed attempt? Aah! But you already know the answer to that! I dared!
I dared and am I glad I did! I am always a sucker for good marmalade. But good home made marmalade? Sheer heaven! And I thought to myself, if I am going to dare, why not take it a step further? Even if it meets a disastrous end, I have a warm cocktail to drown my defeat! So now I present, not just any marmalade. But an easy, super delicious home made Orange Whiskey Marmalade!


Ingredients:
Oranges       1.5 kg
Sugar           1.2 kg
Lemon         1
Whiskey      150 ml
Water          6 cups

Method:
Wash and halve the oranges. Juice them using a citrus juicer. Slice the empty peels into thin strips, discarding any pips you may find.  Place an empty saucer in the freezer to chill.  In a heavy bottomed pan, throw in the sliced peels, the strained orange juice and the water. Bring to a boil. Reduce the heat to the lowest setting, cover and cook for about 30 minutes, Once the peel turns translucent and soft, add the sugar and lemon. Stir till the sugar is dissolved. Let the mixture come to a boil again and then continue to simmer, stirring every ten minutes, After about 50 minutes, the mixture will start becoming translucent and jelly like. Bring out the chilled saucer and place a drop of the orange mix. Return the saucer to the freezer, After three minutes, push the chilled drop on the saucer. If it wrinkles, the marmalade is ready. If it is still liquid and sliding, let the mix cook for another three minutes before testing on the chilled saucer again. Once the marmalade is ready, turn off the heat and stir in the whiskey. Pour into sterilized glass jars and allow to cool to room temperature before putting the lids on. Store in a cool place, or refrigerate for upto six months. 
Go ahead and dare today! Hey! If I could finally break my jam jinx, so can you!


Saturday, March 5, 2016

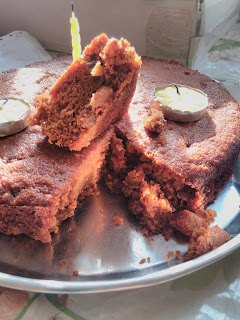
Carrot and Raisin cake

The monster munchkin has turned two! There were days that never ended, and yet when I look back time seems to have just flown. Parenting hasn't gotten easier, just the challenges have changed. Just when I thought I had figured it out, the munchkin will throw a curveball my way. Mum rolls her eyes when I mention it. Her grandkid is an angel and I am the monster!
One thing that hasn't changed, is my obsession to provide him balanced, nutritional meals. And this includes sweet indulgences. Luckily he hasn't taken to chocolates and sugar laden treats like his dear ol' mum! Last birthday he was indulged with a blueberry yogurt cheesecake. And now it is the year of the super healthy Carrot and Raisin Cake. Now scoff all you like. I did too. But surprisingly, it was delicious. And the monster munchkin actually asked for seconds! Guilt free indulgence on his birthday? Hey! Why turn him down?!
So give this kid friendly recipe a go. Duly endorsed by an ecstatic two year old :)

Ingredients:
Carrots                                2, large
Soft Brown sugar               3/4 cup
Eggs                                   2
Butter                                 1/2 cup, melted
Whole Wheat Flour           1 1/4 cup
Baking Powder                  1 teaspoon
Baking Soda                      1/2 teaspoon
Milk                                   1/4 cup
Cinnamon powder             1/4 teaspoon
Clove powder                    1/4 teaspoon
Nutmeg powder                 1/4 teaspoon
Ginger powder                   1/4 teaspoon
Raisins                                1 cup

Method:
Pre-heat the oven to 180 C. Run the eggs and carrots in a food processor till the carrots are finely chopped. Add butter and sugar. Process again till well blended. Pour into a bowl and fold in the rest of the ingredients. Bake in 9x5 inch loaf tin for 45-50 mins. Serve up a slice of health and happiness.


Thursday, February 11, 2016

Cappuccino Walnut Cake

Valentine's Day is not really a biggie at our place. Blame it on hubby dear! He is quite the romantic, and my entire year is peppered with heartwarming gestures.. both small as well as extravagant. Love notes will find their way into the most extraordinary places and that outfit I casually termed nice, will suddenly show up in my closet! But by far the most romantic gesture took place two years ago.
I was preggers and craving desserts. However, we were living in this quaint hill station with a delicious but very basic bakery. Now, over the years, every time hubby asked me to choose a gift, I would promptly ask him to bake me a cake. It became a comic routine between us coz hubby dear's kitchen skills are limited to tea and instant noodles. But this time when we re-enacted the routine on my birthday, he steeled himself and out came a manly, " All right!"
I thought he was joking. But turned out he was quite serious. " I will bake you the fanciest cake you desire. But you will have to guide me through the sticky parts." It was the offer of  a lifetime and there was no way I was letting it go! So out came the recipe books. And the first recipe to pop open was the Cappuccino Walnut Cake!
Now that was a cake that required time, dedication, and above all skill. But the army man was not one to back down from a challenge! He could practically see me salivating over the page! So off he went with whiskey in hand and attacked it with the precision of a strategic battle. Of course, he needed the General's (moi) expert guidance once in a while. But he did it. And all by himself. The end result was the maid begging me to never let him enter the kitchen ever again! And the cake? Gosh! It was the best I had ever eaten. Utterly addictive and full of love! I had to eventually request him to hide it so I wouldn't devour it one sitting :p
So this Valentine's Day, ditch the conventional. And instead, pour your heart into making something your better half will forever cherish. It could be a self written poem, a handmade card, breakfast in bed, or this absolutely divine cake.

Ingredients:
Butter                           65 gm (4 tablespoon), melted and cooled
Maida                          100 gm (3/4 cup)
Baking powder           1 teaspoon
Eggs                            4 
Caster sugar                125 gm (1/2 cup)
Coffee powder            1 1/2 tablespoon, dissolved in a little milk
Walnuts                       3/4 cup, toasted, cooled and chopped

Decoration:
Walnuts                       1/2 cup
Sugar                           1 tablespoon
Cinnamon powder       1/4 teaspoon

Icing:
White Chocolate          200 gm (2 milky bars)
Coffee powder             4 teaspoon, dissolved in a little milk
Cream                           500 gm, lightly whipped

Method:
Preheat the oven to 190 C. Beat the eggs and sugar together in a food processor or with an electric mixer, over a pan of hot water. Beat till the mixture is fluffy. Remove the hot water and continue beating the eggs for another 10 seconds, till it is cooled and leaves a ribbon trail. Gently fold in the the rest of the ingredients. Pour into a greased tin and bake for 25 minutes. Cool. Split the cake into half horizontally. Spread half the icing onto the lower part of the cake. Place the top half. Spread the remaining icing on the top and sides. Coarsely grind the decoration ingredients together. Sprinkle onto the top and sides of the cake. 
For the icing: Chop the chocolate and microwave for 90 seconds, till melted. Beat the coffee and cream till smooth. Slowly beat in the melted chocolate. Icing is ready to be used.


Tuesday, February 9, 2016

Quickie Dahi Chicken


I love my new kitchen! It is large enough for monster munchkin to potter at one end, whilst I experiment and blog at the other. Of late though, he hasn't been content just stirring empty pots. He often wanders over to my cooking area demanding, " Mamma, Up!", to get a closer look at all the bubbling and sauteing. Do I have a chef in the making? Too early to say. But this recipe is definitely the munchkin's brainchild. I dare take no credit for it.
As I stood staring at the chicken, wondering just what treatment I mete, the lil one coolly sauntered over insisting I take the onion he had brought. He kept going back and bringing ingredient after ingredient. All I had to do was put it all in the mixer and let him grind the masala dancing on his tiptoes! Thus was born the quickest, most delicious chicken I have ever tasted. But don't  take my word for it! Give it a whirl and I am sure it will become a permanent in your repertoire. After all, even a two year old could whip it up ;)

Ingredients:
Chicken                          1 kg
Curds                              1 cup
Onion                              1, large
Garlic                              6
Green chillies                  6
Dessicated coconut         1/4 cup
Water                              1 cup
Mustard oil                     2 tablespoon

Method:
Grind the onion, chillies, garlic, curds and coconut together. Heat the oil in a pressure cooker, Add the ground masala. Cook for two minutes. Add the chicken and salt. Stir well till all the pieces are coated. Add the water and pressure cook for four whistles. Told you it was a quickie!

Note: Dessicated coconut is also know as dry coconut powder or nariyal bhoora.


Thursday, February 4, 2016

Bottle Gourd (Lauki) Soup

There are only three people I know who relish the humble lauki. Baba Ramdev, my grandmother and my lil toddler. Though in all fairness, lil toddler will eat just about anything. What is it about this veggie that puts off people? The blandness say some, the seeds say others. Well, the seeds can be discarded. And as for the blandness, well, that is exactly what makes the veggie so versatile! It happily adapts to any flavour and cuisine.
This recipe is my mum's brainchild. You will never catch her eating lauki, she hates it with such passion! But in an effort to introduce the family to healthy eating, she adapted it to soup and the result was simply delicious! So as you flounder around the market looking for veggies to break your soup monotony, bring home a bottle gourd. I promise you will soon be a convert!


Ingredients:
Bottle Gourd (Lauki)       1, medium
Butter                               1 tsp
Onion                               1, chopped
Milk                                 1
Peppercorns                     6
Chana Dal                        2 tablespoon
Water                               3 cups

Method:
 Peel and cut the lauki in cubes. In a pressure cooker, heat the butter. Saute the onion till just golden. Add the rest of the ingredients. Add some salt to taste. Pressure cook for 7 whistles. Once the cooker cools, remove the solids with a slotted spoon and grind in the mixie. Pour the puree back into the liquid and bring to boil, stirring a couple of times. Serve hot and revel in your latest health choice :)

Wednesday, January 20, 2016

Mom's Onion Soup


Onion soup? I know the name doesn't conjure visions of heartwarming, delicious, soul stirring food. But contrary to what most people think, the humble kitchen staple morphs into a flavourful gourmet extravanganza for the taste buds. The French Onion soup is sought after across the world, and features on the menu of some of the best chefs. 
The original Onion Soup calls for beef stock and cream, and is topped with generous amounts of grilled cheese croutons. Not too healthy for the heart or waist, i agree! Thus, presenting, Mom's Onion Soup. Her version still retains those gorgeous golden caramelized onions, but the rest of it is simple, light and infinitely more healthy. I warn you though, this soup is super addictive. Just ask hubby. He's put in a permanent request that mum make two extra mugfuls for him each time! Coz as they say, " No one can drink just one!!"

Ingredients:
Onions            4, large
Butter              2 tsp
Milk                2 cups
Water              2 cups
Peppercorn     10
Salt                 to taste

Method:
Heat butter in a pressure cooker. Add chopped onions, Saute till the onions are golden. Add the rest of the ingredients and pressure cook for 4 whistles. Cool. With a slotted spoon remove the onions and peppercorns and grind them in a mixer. Add the paste back to the liquid and heat on low flame, just before serving. Yes, it is that simple! And if you are feeling particularly indulgent, serve up with a side of grilled cheese toast ;)