Showing posts with label no-fuss. Show all posts

Monday, February 24, 2020

Brigadier Fernando's Spicy Prawns

Who says army guys can't cook? Some of the most lip smacking dishes have been served up by the faujis in my life. All of them instinctive, adaptive and creative cooks! Brig Fernando, or Neville Uncle as I fondly call him, is no exception to this trend. 
I was all of 10 when I met him first. I spent most of that visit hiding behind Dad's legs. Too shy to talk. But I did follow him around the kitchen as he cooked up a lavish Sri lankan style feast. And that is the memory that endured over the years. His jolly commentary as he chopped, marinated, extracted coconut milk. Smiling, coaxing and dispensing cooking tips that I remember still. It is hard for me separate Neville Uncle's memories from the kitchen.
I was thrilled when he made a second trip to India in recent years. Technology made it easier to keep in touch. And when I needed some spicy carnivore recipes to add to my repertoire, I knew whom to call! After all, the taste of his Sri Lankan Chicken Curry still lingers on! Neville Uncle and Senophi aunty happily shared some of their family favourites. Among them all, these spicy prawns have become a staple at mine!
These super easy, super delicious prawns are Uncle's original creation. And I guarantee they will soon be a staple at your table as well! Presenting it here in Uncle's own words.

SPicy prawns

INGREDIENTS:
500 Grams cleaned medium size prawns.- Clean the prawns keep the tail intact.
2 Table spoons each of Ginger and garlic.Cut into thin strips.
2 Bombay onions cut into small cubes.
1 Table spoon Chilly paste or chilly flakes
2 table spoons light Soya sauce.
3 table spoons margarine or butter or even cooking oil.
2 full tea spoons crushed black pepper.
Spring onions to garnish the dish.
1 tea spoons of salt.
1 each of red pepper and green pepper. Cut into strips.(this item is optional).

METHOD:
Wash the cleaned prawns in saffron and salt water.Pat dry and keep aside.
In a non stick pan,  pour the butter or oil.
When oil is hot, add the ginger and garlic strips and fry  for 2 or 3 minutes.
Now add the cleaned prawns and fry for approx 5 to 6 minutes.
Now add the onions and green and red peppers.
Now add the crushed black pepper and salt.
Fry for a minute or two.
Add 2 table spoons of light Soya sauce.
Add the chilly paste or the chilly flakes.
Transfer the prawns to a plate and garnish with 1 inch pieces of spring onions.
PRESTO Brig Fernando 's dish is ready.
Enjoy with yellow rice or bread.

Pl note if you want the dish to be slightly wet add half cup of thick coconut milk just before taking off the fire and fry for 2 or 3 more minutes.

Tuesday, October 24, 2017

The Leftovers Cake

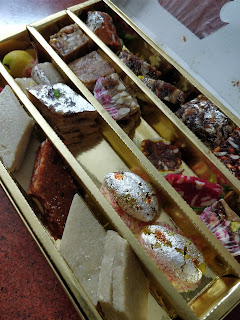
The Diwali frenzy has died down. The diyas have been washed and stored away. The fairy lights have been brought down and carefully returned to their boxes. The din of the crackers had quietened. The belts have loosened a notch. And the fridge is groaning under the weight of the mountain of mithais!
While we wait an entire year to indulge in these special Diwali sweets, the week long exchange makes us groan at the sight of yet another laddoo or barfi
Short of giving it away or crumbling it into yet another kheer or dessert, there aren't too many options around. But this year I decided to be inventive!


While the overdose of mithais had everyone gagging sweet, the realm of cakes had been untouched. If I could reinvent the barfis into a less sweet, unconventional tea cake, I was sure it would  find many takers. 
My inspiration came from the delicious Mawa Cake. This east meets west fusion was perfect for the cake I had in mind. After all, most mithais had a generous base of mawa to complement the dry fruits tucked within. Armed with a random mix of Kaju katlis, anjeer barfi, pista rolls and lavang latikas I set out to bring my experiment to life.
The result you ask? This gorgeous golden hued, light as air cake. The crust was crisp and inside was all soft sweetness. Redolent with the fragrance of mawa and dry fruits, this cake was an instant hit with the young and old alike. People came back for seconds. And thirds! Dipped into tea. Warmed for a quick snack. Topped with shrikhand for a rich dessert. This was definitely the most versatile product of my Diwali Leftovers! 
My fridge is emptied of all the excess mithai that lay unwanted. And I have a house filled with cake satiated tummies! Now if only someone can find a way to recycle all that Son Papdi!


nutsaboutfood

Ingredients:
Leftover Mithai                200 gm
Maida                               200 gm
Butter                               200 gm
Powdered Sugar               150 gm
Cardamom powder          1/4 teaspoon
Baking Powder                1 teaspoon
Eggs                                 4

Method:
Pre heat the oven to 180 C. Beat the butter and sugar well, till it is light and fluffy. Mix in the crumbled mithai. And beat well, till the batter is smooth. Sieve the maida, cardamom powder and baking powder and fold into the batter. Beat the eggs and incorporate into the batter. Mix everything well to get a smooth, consistent batter.
Alternately, if effort is not your thing, just whizz everything together in a food processor or mixie. Pour into a greased baking tin and bake for 45 minutes till a skewer inserted comes clean. Cool and slice!

Tuesday, August 1, 2017

Almond Cheese Spread

We shook off the snow and tumbled into the house. We were cold and hungry. And you know what's my comfort food on a cold, snowy day? Hot, buttered toast! Nothing can make me feel as good. So aunty put the griddle on and liberally coated it with butter, placing two slices of bread to crispen to that beautiful gold. 
When she flipped it over to the other side, I thought we were almost done. But, nope! She had an ace up her sleeve. She dolloped on some cheese spread and let it just melt into the crisping toast. Dotted with ketchup. And then judging my impatience correctly, let me wolf it down straight from the pan.
I waited for the salty, slightly plastic cheesiness of store bought spread to hit my tastebuds. But instead was surprised by subtle flavours so generously complimenting the creamy goodness that could only come with homemade love!
It was so good, I wolfed down six toasts before my foodie brain could form the words, " May I have the recipe, please?"
That was 12 years ago, and I still slather this spread with the same reverent wonder. For me it has the same joy as my grandma's home made white butter. Another dairy addition to my toast I can't get enough of!
Another good thing about this cheese spread is that it sneakily incorporates the wholesome nutrients that  growing tots may screechingly run from. But ever know a kid to turn down cheese and toast? Nope! So say hello to our hidden superfood friends- Almonds and Garlic. Even Keto Hubby gave the spread a big thumbs up! It was just the thing he needed to jazz his Keto Bread :)
So I'll go steal a spoonful from the jar, while you go whip up your own batch of yummy health.


Ingredients:
Cheese           200 gm (grated)
Cream            1/2 cup
Milk               1 cup
Almonds        20
Vinegar          1 tsp
Sugar             1 tsp
Red Chillies   5
Garlic             5
Pepper           1/4 tsp

Method:
Soak the almonds and red chillies for half an hour. De-seed the red chillies. Remove the skin from the almonds and discard the water. Run the almonds, chillies and garlic in the mixie to make a coarse paste. Add the rest of the ingredients and blend till smooth. Refrigerate and use within a week.

Notes:
I used fresh cream (malai) skimmed off the top of our milk. You can use packaged cream as well. 
Since the chillies are soaked and de-seeded, they are not spicy and are mild enough for kids. You can however reduce the chillies if you like.
For the Keto version replace the sugar with Stevia. 

Wednesday, April 19, 2017

Ripe Mango Raita

Summers are here with their blistering cruelty and endless lethargic days. Yawning in the heat, food is really the last thing on anyone's mind. Unless it is a long sip of icy coldness. Sharbats, curds and salads rule the day. And of course, the king of fruits, the sweet sweet mango! Summers are practically synonymous with mangoes. The popularity of this royal fruit transcends all boundaries, and paens have been written in its praise! 
I remember summers in my uncle's orchards where the ripe mangoes had been tossed into the well to cool. Anytime we needed a mango fix all we had to do was lower the bucket and draw up some juicy goodness. Most households in India had a designated bucket in the corner of their kitchen. Filled with cool water and luscious golden mangoes. A friend of mine narrated an interesting custom at grandparents' place in Himachal. Once the mango season started, the kids would go visit, but would only be allowed once they had finished their allotted mini buckets of mango! 
Each household has mango based recipes they guard with the preciousness of jewels. Pickles, salads, jams, chutneys... all find a place in their repertoire. Now the best part of army life is that not only do we traverse diverse regions, but also form close bonds that last a lifetime. Over the years mum has amassed a treasure trove of traditional recipes via her fauji family.
One of mum's closest friends is Bhavani Aunty. She is one of the sweetest, most wonderful human being we've had the joy of calling our own. Not only is aunty a fabulous cook, but also an immensely creative one. She has the talent of spinning the most mundane into something exotic and drool worthy! And when mum tasted the Ripe Mango Raita at her place, she knew it was a recipe she would recreate time and again.
The traditional raita is made either with salad veggies like tomatoes and cucumber or with crispy fried gram flour boondi. But aunty's mango version was unusual and delicious! And really, what could be more summery than chilled curds swirled with chunks of sensational mangoes!
  

NUTTYABOUTFOOD

Ingredients:
Curds                      500 ml
Water                      150 ml
Mangoes                 2, medium
Onion                      1, small
Green chillies          3

tempering: Mustard seeds       1 teaspoon
                   Curry leaves          3 sprigs
                  Red chilli powder   1/2 teaspoon
                  Oil                           1 teaspoon

Method:
Whisk together the curds and water till smooth. Add salt to taste. Finely chop the onion and green chillies. Mix into the whisked curds. Cube the mangoes and gently toss into the mix. Prepare the tempering by heating the oil and letting the mustard seeds splutter. Throw in the curry leaves and let them crisp. Turn off the gas and add the red chilli powder, Swirl the tempering over the prepared raita and chill in the refrigerator for a while. Serve as a side with pulao or biryani. And to be honest, it tastes fabulous on its own!

Tuesday, April 4, 2017

Keto Bread

A low carb, gluten free bread? It never did sound appetizing to me. But then Hubby darling went Keto, and our entire carb approach was tossed into the can. Adapting existing recipes to fit Keto was not as tricky as most fear. Infact as Keto became norm, exciting new twists were born of old classics. 
And though he loved his rice and parathas, hubby didn't quite miss them as much as he had expected. It really was a win win for him.
There was one thing he did miss. While never a fan of regular sliced bread, he had started to crave toast. Who wouldn't when your breakfast is bacon and eggs sunny side up. After all, you need something to mop up all that gooey goodness! Thus was born the need to experiment with a keto friendly bread.
Now the most popular keto breads are almond flour based. Though delicious, almonds aren't quite budget friendly. Every keto forum had people moaning about increased dents in the pocket. So I figured let's do a keto bread that won't break the bank.
I scoured the net for dozens of recipes and finally found my inspiration here. I tweaked it a little so i wouldn't have to make a store run. A few easy steps and surprisingly I got gorgeous golden bread!

nuttyaboutfood.com

Ingredients:
Eggs                                             6
Dessicated Coconut Powder        3/4 cup
Flax Seed (Powdered)                   3/4 cup
Salt                                               1 tsp
Baking Powder                             1 tsp
Psyllium Husk                              4 tablespoons
Baking Soda                                  1/2 tsp
Warm Water                                   1/2 cup
Apple Cider Vinegar                      1 tablespoon
Oregano (optional)                         1 tsp

Method:
Whisk together all the dry ingredients, except oregano. Add the wet ingredients and mix well. Put it in the fridge while you preheat the oven to 180 C. Grease a rectangular baking pan. I used a 13x6. Bring out the batter. Give it a good mix and pour into the dish. Top with crushed oregano. Bake for 40 minutes on a low rack. Cool and slice into 14 squares. It stays happily refrigerated for upto two weeks. Bring out a slice or two. Grill them, toast them, pan fry  them or simply slather cold with some cream cheese and fix that bread craving!

nuttyaboutfood.com

Thursday, February 16, 2017

Keto pork

Love is in the air. As are chocolates and all things sweet. Now I could make a grand Valentine gesture with a cake. But that would be more for me than Hubby Darling. He's never had a sweet tooth, and now that he's on Keto he happily gives desserts a miss. 
He does ecstatically indulge in his favorite foods, though. The ones that make Keto a dream diet for him. Over the past few months, we've been happily experimenting with varied versions of deliciously rich meats. And the most Keto friendly has been Pork. Needless to say Hubby is over the moon! The Goan Pork Sorpotel had been a firm favourite, but we've had to retire that as it wasn't very keto. That left us with the Arunachal style and the mince with spinach. Now Hubby doesn't mind eating the same day in and day out, but how could I let this creative challenge slide?!
Inspired by the simplicity and clean flavours of the Junglee Maas, the Keto Pork was to take a similar direction. Only this time I wanted the flavours to be fresher, sharper. And also closer to the Bhutanese Ema Datshi. 
The Keto Pork has minimal ingredients that are easy to find and yet maximize the taste. It has a familiar warmth reminiscent of Maa ke Haath ka khana. Even if your Maa didn't cook pork! Like most recipes, this one is pretty adaptable. If pigs make you squeal, use meat or chicken. Just amp up the fat factor as they don't have the same amount of fat as our Oink Oink! You can tone down the chillies. Swap the herbs. Play around and make the flavours truly your own!


Ingredients: Pork with Fat                      1 kg
                      Ghee                                   8 tablespoons
                      Green Chillies                    20
                      Garlic with green tops        12
                      Coriander leaves                 1 bunch
                      Peppercorn                          20 (coarsely crushed)
                      Salt                                      to taste

Method: Grind together the green chillies, garlic and coriander. I prefer it coarse for a rustic flavour, but you can keep it as coarse or fine as you like. Heat the ghee in a heavy bottomed pan. Add the pork pieces and saute till the edges turn a little crisp and golden. Add the rest of the ingredients and mix well. Add water just below the level of the meat. Turn the gas down to sim. Cover and cook till done, stirring occasionally. Soup it up or chow down with some cauliflower rice. Happy Ketoing!


Thursday, December 8, 2016

Not Just Any Hot Chocolate!


Growing up on a healthy diet of Enid Blytons and Archies, I was besotted by the seemingly exotic Hot Cocoa. Sipped steaming with a tossing of marshmallows, seated on a warm rug in front of a roaring fireplace. A dog cuddled next you and a throw carelessly wrapped around the shoulders. Really, that was the romanticism of winter for me. I dreamt of staring out the window, watching the snow fall softly as I warmed my palms on my very own cup of Hot Cocoa, the aroma of chocolate wafting through my senses. 
Mum didn't laugh off my fantasies. She indulged me with her shorthand version of the Hot Cocoa. But warm milk with drinking chocolate just didn't have the same magical feel. Dad would add a capful of brandy and insist it was the secret ingredient to that elusive taste. But sigh! My literary tastebuds weren't fooled!
Many snowfalls and failed milky cocoas later, I found it! As Nigella beamingly stirred her pot of hot chocolate, I knew it was The One! I could almost inhale the aroma through the telly. And I wasn't wrong. I made it the very next evening. And as we sipped it under the wintry stars, my chocoholic cuz agreed every sip was a trip to heaven. We had found the Hot Cocoa of our literary dreams!
Over the past few years, I've played around with the flavours, tweaking it a lil here and there. Made it truly my own. And as the winter chill nips my toes, I tuck em under my snoring dog, pull my Naga shawl a little closer and revel in that warm, molten chocolate dreamily making its way down my throat. The magic is alive. And this is Not Just Any Hot Chocolate! 


Ingredients:
Milk                            2 cups
Dark Chocolate           100 gms, chopped or shredded
Cinnamon                    1/2 inch stick
Brown Sugar               1 teaspoon
Vanilla Syrup               1 1/2 teaspoon
Peppercorn                 4, crushed coarsely
Rum                            1/4 cup

Method:
Pour the milk, chocolate, peppercorns, sugar and cinnamon into a saucepan. Heat on the lowest flame till the chocolate dissolves completely. Take off the heat and add the rum and vanilla syrup. Whisk well. Strain and get ready to be transported to Chocolate Heaven!

Notes: I used Monin Vanilla syrup but you can easily replace it with vanilla extract mixed with honey. And if you want a more decadent experience, substitute half cup of milk with Amul fresh cream :) 


Saturday, November 12, 2016

Cheese Straws

I was not a skinny child. Far from it really. The culprit though was Mum. She is an amazing cook and kept me interested in food by dishing out a wide variety of delicious home cooked food. An expert of most cuisines, her passion lay with baking. It was no coincidence then that I always had a tempting array of cakes, cookies and crackers to snack on. Even the extra miles Dad made me run weren't enough to dent the sunshine of Mum's baking! 
One of my favorite things to munch on were these twisted golden delights. Cheese straws! Aahh! The very name was enough for my tastebuds to conjure the crisp-buttery-melt-in-the-mouth-cheesiness. Every batch Mum baked would disappear in minutes, even as the melted cheese scalded my tongue. I never could wait for them to cool down! 
Its not just me, but Hubby darling as well. The first time I made them, he insisted that these Cheese Straws become a pantry staple. And they do have to make an appearance at every party I host. Served plain in bowls or with a choice of dips, these go down fabulously with kids and adults alike. And when you snuggle with a book and hot tea on those wintry afternoons, these little twists will keep you good company! And when you run out, they are easy enough to bake on demand :) 


Ingredients:
Cheese          50 gms
Butter           50 gms
Flour            1 cup
Salt              1/2 teaspoon
Milk             1/2 cup
Pepper          1/2 teaspoon
Oregano       1/2 teaspoon (optional)

Method: Sift the flour and salt together. Grate the butter and cheese into the flour and mix lightly. Adding a little milk at a time, mix it into a smooth dough. Do not knead. Divide and flatten into two halves. Cover with clingfilm and freeze for an hour. Unwrap and roll out  to a thickness of 1 cm. Like a thick roti. Sprinkle with the pepper and oregano. Cut into strips and twist. Preheat the oven to 180 C and bake for 15 minutes till crisp. You can vary the flavours by experimenting with the herbs you sprinkle on top. And do try to wait for them to cool before you take that first bite!

Saturday, October 29, 2016

Bread Gulab Jamuns

Gulab Jamuns could truly be the most pan-Indian dessert. Found in every corner of the country, big and small, the flavour rarely varies despite the regional twists. Rose, kewra, cardamom, saffron... the gulab jamun still tastes just like home. 
I have yet to meet a person who doesn't like gulab jamuns. Or G-Jams,  to borrow a term from my cousin. Even those who prefer savoury over sweet can rarely resist the call of the G-Jam! Really, what's not to like? Golden, fried dumplings soaked in cardamom scented sugar syrup. Exotically delicious, yet endearingly simple!
The commercially available G-Jams are usually made of khoya. And homemakers like mum choose the less complicated route of instant G-Jam packets that use milk powder for a smoother, lighter version that is a lot less complicated than the original. And then there is a third, more unorthodox version. The Bread Gulab Jamuns!
I was first introduced to the bread version during my college years. Homesick on diwali, one of our friends surprised my roomie and me with a huge box of gulab jamuns. Made by his fauji mess cook. As we popped the first one into our mouth, he dropped the B-word! These were made with regular white bread! Despite being a foodie and a cooking enthusiast, I would never have guessed had he not told us! As for the taste? Suffice to say I disappeared with the entire box, coz, " Joey doesn't share food!"
I've been looking for the perfect recipe ever since and after many years of trial and error, I've created one that would have made the old Cook baba proud!


Ingredients:
Bread                        12 slices (I used wholewheat)
Custard Powder        3 tablespoon
Baking Soda             1 teaspoon
Milk                          2 cups
Sugar                        1 1/2 cup
Water                        1 1/2 cup
Cardamoms              3
Oil                             to deep fry

Method: Trim the edges of the bread. Soak a slice of bread in milk and squeeze to remove the excess. Repeat with all the slices. Run the crumbled, wet bread with the custard powder and baking soda in the food processor. Gently pulsing twice to obtain a smooth yet firm paste. Heat the sugar, water and crushed cardamoms in a deep pan till the syrup reaches a sticky, one string consistency. Take off the heat. Meanwhile, gently form the bread paste into smooth balls. Take care not to press too hard while rolling them or the consistency will not be spongy. Heat oil and gently drop the bread jamuns few at a time. Cook over medium heat so that the outside doesn't brown before the inside cooks. Once they are evenly golden, drain on kitchen paper and transfer to the warm syrup. Repeat with all the G-Jams. You can eat them warm or chill them in the refrigerator to serve later. Either way, they are easy to make and are always a blockbuster hit!


Saturday, October 15, 2016

Junglee Maas


My grandfather was eighty plus when one fine day he loaded a rucksack into the back of our jeep. Picked up an old army pal of his and drove straight across the country, from the south to the north east. We had no clue where he had gone or when he would be back. A month later he returned, with a rejuvenated laugh and a twinkle in his eye. And a huge wild boar in the back. Ready to be skinned and pickled.
Shikaar! Aah! That word throws up romantic images of tough men on horseback or open jeeps, rifles slung on the shoulders, tracking the elusive beast through dense jungles. Fearless and focused. Images of late night campfires and rustic food. Smells of sweat, rum and meat mingling with the smoke and the cool night air. 
I've never been on a shikaar or hunting expedition. But the vivid recollections of my father and grandfather transport me to those adrenaline fuelled times. When being true to the roots also meant being in touch with the most basic survival skills handed down by the primitive tribe. 
Hunting expeditions often lasted for days and meals had to be rustic and basic. Carrying fancy ingredients was out of the question. The meat was shot fresh and the only spices used were those that would not perish in the punishing heat. Out of these expeditions was born the hunter's Junglee Maas. A one pot dish with no frills and just a wholesome meaty flavour. High on calories and protein, this was the perfect meal to energize travel weary bones and sore muscles.  


The original recipe calls for ghee, red chillies, salt and of course, meat. The resultant dish is a mildly spiced, juicy and tender meat, crowned by a flaky and crisp exterior. A contrast that delights with every bite. The gravy is thin with a buttery goodness. And if you make it under a starry sky on an open fire, the smokiness from the wood will elevate it to a whole other dimension. 


Ingredients:
Goat Meat                 1 kg
Dry Red Chillies       20
Ghee or Butter          250 gm
Salt                            to taste

 Method: Melt the ghee/butter in a deep pot. Add the meat and the red chillies and cook for a medium flame till all the pieces are generously coated with the ghee. Add the salt and just enough water to reach the level of the meat pieces. Reduce the flame and cook covered till the meat is done. Stir occasionally, adding water if the dish starts to dry. Slurp it like stew, soak it with bread or serve up with some steamed rice.


Sunday, September 4, 2016

Meat pickle

I can't stop dancing. Or singing. Its that time of the year finally! Time for my annual vacation home. Three weeks of doing absolutely nothing. Three weeks of being completely pampered by mum and dad. And three weeks of gorging on all my favourite food, cooked not by me, but by mum, granny, aunt and my darling Robert uncle! And yes, I absolutely aim to overindulge!
Last Sunday as we sat making plans for the upcoming vacay, Hubby Dear issued a dire warning against pilfering his share of the meat pickle this year. You see, every year when we go home, Mads Masi bottles a jar of the most sinfully addictive meat pickle, exclusively for HD. It was great in the earlier years when I was following a vegetarian diet. But then I returned to the meat fold, with a vengeance! So when last year's batch made its way to us, HD was none to happy he had to share. But imagine his disappointment a couple of hours later when he poured himself a chilled beer and headed to spoon a few pieces of his favourite snack. The pickle jar was empty! In my defence, running after the monster munchkin all day is hungry work. And did I mention the pickle is sinfully addictive?!
He was of course mollified when Masi bottled a batch specially for him and I swore to keep my fork away. 
The memory though, remained. Hence, the dire warning! And that was what led to my sleepy sunday turning into a sweaty one. Ever had one of those moments when you share a food memory and the description is so vivid you can almost taste it in your mouth. And so strong is that sensation that you just have to have it. Like right that moment. Or your tastebuds will drive you nuts as you drool unchecked?! Well, lets just say we needed our meat pickle fix. Right that moment. A week was too far away!
A frantic call to Masi for the recipe and we were raring to go! The only hitch? Goat's meat wasn't available! But as my friend said, Baa ain't too far from Oink. So pork it would be! The promise of that tangy, tasty pickle spurred everyone into action. HD took off to bring us the choicest cuts. And Oink Friend helped peel, chop, grind and stir. And stir. And stir! And...excuse me, while I go polish off that last forkful ;)


Ingredients:
Meat (boneless)       1 kg (goat/beef/pork/lamb)
Mustard oil              1 1/2 cups
Ginger                      100 gms
Garlic                       125 gm
Vinegar                     1/3 bottle
Sugar                         a pinch
Garam Masala          1 heaped tablespoon
Salt                            to rub

Method:
Wash the meat well and rub the pieces with salt. Keep aside for two hours. Grind the ginger and garlic to a fine paste. In a heavy bottomed pan, heat the oil on high flame and saute the meat. When the pieces start shrinking, and the meat is half done, add the ginger garlic paste. Reduce the flame to the minimum. Add cook till the meat is done. Stir frequently in between to ensure the meat doesn't stick to the bottom of the pan. Add the sugar and garam masala and cook for another five minutes. Let it cool for 1/2 an hour. Stir in the vinegar and store in sterilized jars. If the weather is warm, it is better to keep the pickle refrigerated. It will keep in refrigerator for a couple of months. Provided of course, you have the willpower ;)

Thursday, July 14, 2016

Homemade Raisins


Its been a while that I've posted on the blog. That didn't mean I wasn't experimenting and turning my kitchen into a lab! The last I posted I was working my way through a large batch of oranges. Well, the oranges met a delicious end. And then came the avalanche of grapes. They found their way onto salads and fruit cream and the monster munchkin's snacks. But just when I thought I was done with them, a whole new bunch would make it to my fridge. This needed large scale tackling and I figured let me save them for a rainy day. Now the only way to make them last intact till the aforesaid rainy day was the sundried way aka raisins.
Now, i am a raisin phobe. Cannot abide those slimy squishy things in any dessert or cake. But hubby dear and monster munchkin like em well enough. And they are great for zinging desserts when we've got company. I trawled the net for various recipes and in the end settled for one I found between the yellowing pages of the first recipe diary I started at the age of ten! It is simple and requires practically no effort from my end, And a few glorious days later, I get rewarded with glossy, granola worthy raisins. It was almost like Farmville all over again!

Ingredients:
Seedless Grapes     1 kg
Water                      1 litre
Milk                        1 tablespoon

Method:
Remove the grapes from the stalk and wash them well. Boil the water and milk together in a deep pan. Add the grapes and continue boiling till the grapes turn a lighter green. Drain well in a colander. Spread out on a thin cloth under the sun. Cover with another thin muslin. After three to four days of bright sunshine, voila, the grapes are now golden raisins!


Saturday, April 16, 2016

Mocha Layer Pudding

Everybody loves dessert. And if you are me, you probably skip the main course to make room for dessert. But be warned! You can't serve me ice cream and call it dessert. Ice cream is ice cream. When I was younger, parties always meant light citrus souffles and decadent mousses. There were multi layered trifles and warm, gooey flans. Ice creams were for weekdays when mom was too busy to whip up dessert. 
Of late though, desserts have vanished from the dinner parties. Too complicated and tedious, say the ladies. Trust me, it doesn't have to be. I am no superhero domestic diva, but I do manage to serve up a duo of desserts at the dinners I host. This Mocha Layer Pudding is almost always a permanent on my menu. And it only takes me five minutes. Honest! 
Give yourself a treat today and go ahead and try this blockbuster hit. I promise you will never fear once you've tried this dessert dare!


Ingredients:
Bread                          10 slices
Cocoa Powder             6 tbsp
Coffee Powder            1/2 tbsp
Sugar                           6 tbsp, powdered
Fresh Cream               500 gms
Walnuts                       1/2 cup, chopped
Rum or Brandy          2 tbsp (optional)

Method:
Run the bread in the mixer to make bread crumbs. Whip the cream lightly and add 2 tablespoons of sugar and the brandy or rum. To the bread crumbs, add the rest of the ingredients and mix well. In a serving dish, spread a layer of the bread mix. Then pour a layer of the cream. Repeat layers till the ingredients are used up, ensuring the last layer is of the cream. Garnish with chocolate bits and shavings and some walnuts, Refrigerate for an hour. And you have yourself an easy dessert to indulge!


Saturday, March 5, 2016

Carrot and Raisin cake

The monster munchkin has turned two! There were days that never ended, and yet when I look back time seems to have just flown. Parenting hasn't gotten easier, just the challenges have changed. Just when I thought I had figured it out, the munchkin will throw a curveball my way. Mum rolls her eyes when I mention it. Her grandkid is an angel and I am the monster!
One thing that hasn't changed, is my obsession to provide him balanced, nutritional meals. And this includes sweet indulgences. Luckily he hasn't taken to chocolates and sugar laden treats like his dear ol' mum! Last birthday he was indulged with a blueberry yogurt cheesecake. And now it is the year of the super healthy Carrot and Raisin Cake. Now scoff all you like. I did too. But surprisingly, it was delicious. And the monster munchkin actually asked for seconds! Guilt free indulgence on his birthday? Hey! Why turn him down?!
So give this kid friendly recipe a go. Duly endorsed by an ecstatic two year old :)

Ingredients:
Carrots                                2, large
Soft Brown sugar               3/4 cup
Eggs                                   2
Butter                                 1/2 cup, melted
Whole Wheat Flour           1 1/4 cup
Baking Powder                  1 teaspoon
Baking Soda                      1/2 teaspoon
Milk                                   1/4 cup
Cinnamon powder             1/4 teaspoon
Clove powder                    1/4 teaspoon
Nutmeg powder                 1/4 teaspoon
Ginger powder                   1/4 teaspoon
Raisins                                1 cup

Method:
Pre-heat the oven to 180 C. Run the eggs and carrots in a food processor till the carrots are finely chopped. Add butter and sugar. Process again till well blended. Pour into a bowl and fold in the rest of the ingredients. Bake in 9x5 inch loaf tin for 45-50 mins. Serve up a slice of health and happiness.


Tuesday, February 9, 2016

Quickie Dahi Chicken


I love my new kitchen! It is large enough for monster munchkin to potter at one end, whilst I experiment and blog at the other. Of late though, he hasn't been content just stirring empty pots. He often wanders over to my cooking area demanding, " Mamma, Up!", to get a closer look at all the bubbling and sauteing. Do I have a chef in the making? Too early to say. But this recipe is definitely the munchkin's brainchild. I dare take no credit for it.
As I stood staring at the chicken, wondering just what treatment I mete, the lil one coolly sauntered over insisting I take the onion he had brought. He kept going back and bringing ingredient after ingredient. All I had to do was put it all in the mixer and let him grind the masala dancing on his tiptoes! Thus was born the quickest, most delicious chicken I have ever tasted. But don't  take my word for it! Give it a whirl and I am sure it will become a permanent in your repertoire. After all, even a two year old could whip it up ;)

Ingredients:
Chicken                          1 kg
Curds                              1 cup
Onion                              1, large
Garlic                              6
Green chillies                  6
Dessicated coconut         1/4 cup
Water                              1 cup
Mustard oil                     2 tablespoon

Method:
Grind the onion, chillies, garlic, curds and coconut together. Heat the oil in a pressure cooker, Add the ground masala. Cook for two minutes. Add the chicken and salt. Stir well till all the pieces are coated. Add the water and pressure cook for four whistles. Told you it was a quickie!

Note: Dessicated coconut is also know as dry coconut powder or nariyal bhoora.


Thursday, February 4, 2016

Bottle Gourd (Lauki) Soup

There are only three people I know who relish the humble lauki. Baba Ramdev, my grandmother and my lil toddler. Though in all fairness, lil toddler will eat just about anything. What is it about this veggie that puts off people? The blandness say some, the seeds say others. Well, the seeds can be discarded. And as for the blandness, well, that is exactly what makes the veggie so versatile! It happily adapts to any flavour and cuisine.
This recipe is my mum's brainchild. You will never catch her eating lauki, she hates it with such passion! But in an effort to introduce the family to healthy eating, she adapted it to soup and the result was simply delicious! So as you flounder around the market looking for veggies to break your soup monotony, bring home a bottle gourd. I promise you will soon be a convert!


Ingredients:
Bottle Gourd (Lauki)       1, medium
Butter                               1 tsp
Onion                               1, chopped
Milk                                 1
Peppercorns                     6
Chana Dal                        2 tablespoon
Water                               3 cups

Method:
 Peel and cut the lauki in cubes. In a pressure cooker, heat the butter. Saute the onion till just golden. Add the rest of the ingredients. Add some salt to taste. Pressure cook for 7 whistles. Once the cooker cools, remove the solids with a slotted spoon and grind in the mixie. Pour the puree back into the liquid and bring to boil, stirring a couple of times. Serve hot and revel in your latest health choice :)

Wednesday, January 20, 2016

Mom's Onion Soup


Onion soup? I know the name doesn't conjure visions of heartwarming, delicious, soul stirring food. But contrary to what most people think, the humble kitchen staple morphs into a flavourful gourmet extravanganza for the taste buds. The French Onion soup is sought after across the world, and features on the menu of some of the best chefs. 
The original Onion Soup calls for beef stock and cream, and is topped with generous amounts of grilled cheese croutons. Not too healthy for the heart or waist, i agree! Thus, presenting, Mom's Onion Soup. Her version still retains those gorgeous golden caramelized onions, but the rest of it is simple, light and infinitely more healthy. I warn you though, this soup is super addictive. Just ask hubby. He's put in a permanent request that mum make two extra mugfuls for him each time! Coz as they say, " No one can drink just one!!"

Ingredients:
Onions            4, large
Butter              2 tsp
Milk                2 cups
Water              2 cups
Peppercorn     10
Salt                 to taste

Method:
Heat butter in a pressure cooker. Add chopped onions, Saute till the onions are golden. Add the rest of the ingredients and pressure cook for 4 whistles. Cool. With a slotted spoon remove the onions and peppercorns and grind them in a mixer. Add the paste back to the liquid and heat on low flame, just before serving. Yes, it is that simple! And if you are feeling particularly indulgent, serve up with a side of grilled cheese toast ;)


Thursday, December 31, 2015

Mulled Wine


Christmas has just passed and already the new year is upon us! Seems like yesterday that we were ushering in 2015, and now its time to bid it adieu! But there is no sorrow in that. The year has been fair and the new one just offers more to look forward to. For now, I sit back and enjoy the festive air that warms the chill in the wind. I love the happy, carefree feel that comes this time of the year. When we all shed our baggage and Ho Ho Ho our thoughts and speech. It is also the time of year when the vodkas and martinis and sangrias gave way to the more traditional. Tis the season to be jolly... with mulled wine warming my belly! The warm spiced wine gently making its way down my throat. Clearing that lingering cough and cold. Enveloping me in the warm, fuzzy Santa hug. And of course, the best way to use up all that cheap wine languishing at the back of the cupboard! So mull yourself some wine. Pour one for you and yours and wish everyone with all the cheer. Happy New Year guys! Make every moment count!

Ingredients:
Water                             2 cups
Sugar                              1/2 cup
Cloves                            12
Cinnamon                       2 inches
Nutmeg powder              1/2 tsp
Dry Ginger Powder         1/2 tsp
Lemon                             1/2
Red wine                         750 ml
Brandy                            1/4 cup

Method:
Heat water in a pan. Add sugar, spices and lemon. Reduce heat before it comes to a boil and simmer for 10 minutes. Add wine and heat till just below boiling point. Now add the brandy. Turn off the flame. Serve warm in goblets and inhale the festive spirit!

Thursday, December 10, 2015

Super Simple Pumpkin Soup


Winter is Coming! No, Wait! Winter is here! Not in the Stark way. But more of the 'dilli ki sardi' kinds. And how do I know winter's here? Well, the nip in the air and the extra layer of clothes, sure. But what positively heralds the onset of winters at my place is Soup Dinners!
It is another ritual that harks back to my childhood. The moment the weather turned, Mum would chop up those pesky veggies and dish out some awesome soup. Teamed with hot buttered toast and a baked casserole, this was the perfect weekday comfort food. Luckily, hubby dear is also quite the soup fan. Or maybe mum's soups have converted him! Either way, Soup Dinners live on in my household as well. With the toddler yum yumming every warm sip!
Mum's soups were always made fresh, light and flavourful. No gloopy cornflour from a packet for us. Infact soups are so quick and easy to make that it never ceases to amaze me that people choose the pricey preservatives to the fresh route! So, this winter here's my request. Give my soups a try. I promise to convert you! And come summers, your bikini bod will thank you ;)


Ingredients:
Pumpkin, chopped                1 cup
Onion                                     1
Peppercorns                         8
Nutmeg powder                   1/4 tsp
Ginger, chopped                   1 inch
Water                                    4 cups
Salt                                        to taste
Butter                                    2 tsp

Method:
In a pressure cooker, heat the butter. Add the onions and saute till translucent. Add the pumpkin and saute for another minute. Now add the rest of the ingredients and pressure cook for 4 whistles. Cool. Run in the blender till well mixed. Heat on low flame just before serving. Super Simple, didn't I say?!


Friday, November 13, 2015

Hara Bhara Chicken

The weekend is here, finally! And after all the Diwali madness, it is time for some comfort food. Now don't get me wrong. As far as food goes, it is all comfort to me! But right now I feel like some warm brothy chicken with a no fuss attitude and tankards of taste. Light on the masala and heavy on flavour. The kind of soul chicken that you can dip a  couple of slice of bread in (if you are me), or drown your rice in (if you are hubby). The kind of Chicken, that on a nippy November evening reminds you of a warm fireplace and home. Oh, and the kind of chicken that does not require me spending hours chopping, frying, cleaning!
Now this chicken doesn't look the lurid green required of a hara bhara, but there are some greens in there I promise!


Ingredients:
Chicken                      1 kg
Coriander                    1 bunch
Green Chillies             7
Cloves                         4
Black Cardamom        3
Ginger                         1 inch
Garlic                          5 cloves
Mustard oil                 4 tablespoons 
Curds                          2 cups
Kasuri Methi              1/4 cup
Water                          350 ml

Method: Grind together the coriander, cloves, ginger, garlic, cardamom and chillies. Heat oil in a deep pan and add the ground masala. Once the masala browns, and the fat separates, add the curds. Cook for five minutes. Add the chicken and salt. Stir till all the pieces are well coated. Add the water. Reduce the flame to sim. Cover and cook till done. Stir in the kasuri methi. And you are done! Simple, isn't it?